Redis-Based Distributed Locks and the Redlock Algorithm
A distributed lock is a locking mechanism used to safely control access to shared resources in distributed environments where multiple processes or nodes can access those resources simultaneously.
Today’s topic is aimed at finding answers to the following questions:
- How can we prevent the same concert seat from being sold to multiple people at the same time during ticket booking?
- How can we ensure a cron job runs only once when executing across multiple nodes?
- When the payment-related DB and product inventory DB are separate, how can we handle transactions?
Problems That Can Occur in Distributed Systems
Race Conditions
- When multiple nodes access and operate on the same resource simultaneously, causing the order of operations to get mixed up
- Cases where two servers read the same value from the DB at the same time and modify it, leaving only the last modification
Duplicate Work
- The same task being executed redundantly across multiple nodes
- Cron jobs running in parallel across multiple nodes
Data Consistency Breakdown
- Each node in a distributed system reads data from different points in time, breaking data consistency
- Suppose servers A and B are both handling payments:
- Only 1 unit of a product remains in stock
- At the same moment server A checks and sees 1 unit remaining, server B processes a payment and decrements the stock by 1 — meaning when server A proceeds with its payment, the actual stock is already 0
Leader Election Issues
- Among multiple nodes, exactly 1 node must be elected as leader. Multiple nodes must not be elected as leader simultaneously.
- An example is Kafka electing a leader broker to coordinate between brokers
Purpose of Locks
Efficiency
Locks can be used to prevent unnecessary costs that arise from multiple nodes repeatedly performing the same task.
Correctness
Locks can be used to prevent data corruption and consistency violations that arise when concurrent processes attempt to access and modify the same resource.
According to Martin Kleppmann (author of Designing Data-Intensive Applications), when introducing a distributed lock, it’s important to clearly understand whether you’re doing so to solve an Efficiency problem or a Correctness problem.
For example, if you’re introducing a distributed lock for Efficiency purposes, the Redlock Algorithm may not be the right fit. The cost of setting up 5 separate Redis masters and attempting to acquire a lock from a majority of them just to reduce duplicate work is likely to be higher than the cost of the duplicate work itself.
Implementing Distributed Locks with Redis
Redis is a single-threaded, in-memory store with fast reads and writes. Because it processes commands sequentially one at a time on a single thread, it is frequently used for implementing locks.
Example: Cron Job in a Distributed Environment
We’ll implement an example that ensures a cron job runs only once per execution cycle in an environment with multiple redundant nodes.
- A cron job may be triggered on multiple nodes
- If a cron job starts on one node first, the other nodes should not execute that job
Defining the Cron Task
We mock a task that runs for 10 seconds.
| |
Main Structure
If a lock is already held, the task is not executed. If no lock is held, the task runs.
| |
newRedisClient is a constructor that creates a Redis client with acquireLock and releaseLock methods. The implementation is explained below.
Lock Implementation
| |
Lock acquisition and release are handled using go-redis’s SetNX.
Note that the SetNX command is deprecated, but go-redis still supports it and internally uses the SET command to set a value only when the key does not exist.
When setting a lock, a TTL is used to prevent deadlocks.
Caveats and Considerations
- Deadlock prevention: Set a TTL (timeout) to ensure the lock doesn’t remain held indefinitely.
- Lock re-verification: Since the lock may have expired, add logic to re-check the lock state mid-task.
- Lock double-checking: Use algorithms like Redlock to strengthen lock reliability in distributed environments.
So far, we’ve implemented the lock assuming a single Redis instance. However, this implementation has one major problem.
Redis becomes a SPoF (Single Point of Failure).
Then wouldn’t a master-slave setup solve this rather than a single instance? The answer isn’t that simple.
The Redlock Algorithm
The Flaw in Master-Slave Architecture
- Client A acquires a lock from the master
- Before the master can replicate the lock information to the replica, it crashes and goes down
- The replica is promoted to master
- Client B acquires a lock from the newly promoted master — but this resource is still being worked on by A
The Redlock Algorithm
The Redlock algorithm acquires locks across multiple Redis nodes, ensuring that even if one Redis instance experiences a failure, the consistency and reliability of the overall system is maintained.
- Using multiple Redis instances: Redlock requests locks from multiple Redis servers so that the system is not affected by a single Redis node failure. This requires a minimum of 5 Redis nodes.
- A majority quorum is required: To acquire a lock, it must be obtained from a majority of Redis servers. For example, with 5 Redis servers, the lock must be acquired from at least 3 servers to be considered valid.
- Lock validity verification: Since the time it takes to acquire a lock may vary across Redis servers, the expiry time is verified after acquisition to confirm the lock is still valid.
How the Redlock Algorithm Works
The client operates in the following sequence:
- Record the current time in milliseconds
- Sequentially attempt to acquire the lock on all N Redis instances using the same key and a random value. Set a short timeout for each attempt so that if a node is down, the client immediately moves on to the next instance.
- Calculate the total time elapsed to acquire the locks. If a majority of the N instances granted the lock and the elapsed time is less than the lock’s validity duration, the lock is considered successfully acquired.
- If the lock is acquired, the effective validity time is set to the initial validity time minus the elapsed time.
- If the lock was not acquired, or if the remaining validity time is negative (meaning it expired during the acquisition process), release the lock on all instances.
Advantages
- High availability: Because multiple Redis servers are used, the lock remains valid even if one server goes down.
- High reliability: Requiring lock acquisition from multiple servers guarantees reliability in distributed systems.
- Advanced distributed locking: Redlock provides safe locking in distributed systems and guarantees mutual exclusion.
Disadvantages
- Complexity: Communicating with multiple Redis servers makes the implementation somewhat complex.
- Performance degradation: Time is spent communicating with each server, leading to reduced performance. Since retry logic must be implemented for failed lock acquisitions, this can impact performance at scale in large distributed environments.
- Time synchronization required across Redis nodes: Since Redlock acquires locks from multiple servers and calculates expiry times, each server’s clock must be accurately synchronized.
Considerations
- Each Redis master must run on an independent machine or VM and operate independently from one another.
- To minimize split-brain conditions, theoretically clients should use multiplexing to send SET commands to all N masters simultaneously, acquiring locks from the majority of masters as quickly and concurrently as possible.
- A client that fails to acquire locks from a majority of masters should immediately release any locks it did acquire, rather than waiting for the keys to expire.
Limitations
The following is a summary of the limitations of the Redlock algorithm as described in Martin Kleppmann’s blog. https://martin.kleppmann.com/2016/02/08/how-to-do-distributed-locking.html
Distributed locks themselves carry the following potential failure scenarios:
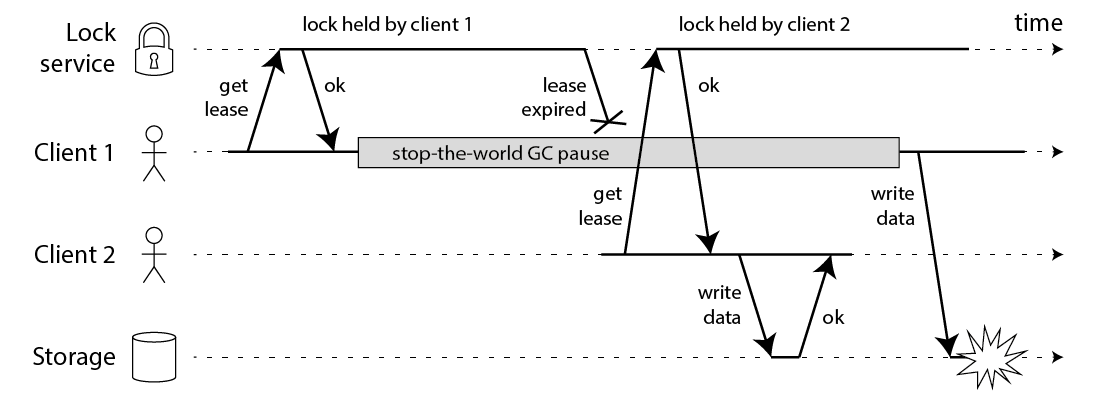
Martin Kleppmann, How to do distributed locking
- Client 1 successfully acquires the lock and attempts to write to storage, but a delay occurs (GC pause, network delay, etc.)
- In the meantime, the lock expires
- Client 2 acquires the lock and completes its write to storage before client 1 finishes
- Client 1 then completes its write to storage (data corruption!)
To address this, fencing tokens can be used. A fencing token is an incrementing numeric token. If a write request arrives at storage with a fencing token number lower than the one from the most recent successful write, it is treated as a stale token and the write is rejected.
The problem is that neither the Redlock Algorithm nor Redis provides this mechanism internally. And even if you were to force such a mechanism, you’d face the challenge of ensuring that n different masters can provide fully synchronized fencing tokens.
Timing Issues
The time perceived by each node is not precisely synchronized and can differ by minutes for various reasons.
For this reason, timing issues can be problematic in distributed environments — and the Redlock algorithm is heavily dependent on timing, making it potentially vulnerable.
However, Redlock is not like this. Its safety depends on a lot of timing assumptions: it assumes that all Redis nodes hold keys for approximately the right length of time before expiring; that the network delay is small compared to the expiry duration; and that process pauses are much shorter than the expiry duration.
For these reasons, Martin Kleppmann argues that the Redlock Algorithm is neither simple nor guaranteed to be correct, and is therefore not suitable as a locking mechanism for distributed systems.
Using Redlock Easily in Go
The Redsync library makes it easy to apply the Redlock Algorithm.
| |
Just like using a regular lock, you can call the Lock and Unlock methods on the mutex instance created with NewMutex to acquire or release the lock.
How Does Redsync Implement the Redlock Algorithm?
First, let’s look at the Mutex struct:
| |
Internally, the lockContext method is called with the following signature:
| |
It attempts to acquire the lock within the given number of tries, and retries on failure. The retry delay is randomized in accordance with the Redlock algorithm’s principles:
| |
Returning to the lockContext method:
| |
It calls a function named m.actOnPoolsAsync. This function accepts a function and iterates over the pools, executing it on each. It returns the number of masters from which the lock was successfully acquired, along with any error.
| |
The lockContext function receives this result as n, err.
Finally, the lockContext function verifies whether the lock was acquired from a quorum or more of the instances, and whether the lock validity time has not yet expired:
| |